/.clawhub/lock.json`, because current ClawHub docs do not document an uninstall
subcommand.
`/skill search` can legitimately return no matches. In that case nanobot now replies with a
clear "no skills found" message instead of leaving the channel on a transient searching state.
If the ClawHub registry API or `npx clawhub@latest` cannot be reached, nanobot also surfaces the
underlying network or HTTP error directly so the failure is visible to the user.
Heartbeat (Periodic Tasks)
The gateway wakes up every 30 minutes and checks `HEARTBEAT.md` in your workspace (`~/.nanobot/workspace/HEARTBEAT.md`). If the file has tasks, the agent executes them and delivers results to your most recently active chat channel.
**Setup:** edit `~/.nanobot/workspace/HEARTBEAT.md` (created automatically by `nanobot onboard`):
```markdown
## Periodic Tasks
- [ ] Check weather forecast and send a summary
- [ ] Scan inbox for urgent emails
```
The agent can also manage this file itself — ask it to "add a periodic task" and it will update `HEARTBEAT.md` for you.
> **Note:** The gateway must be running (`nanobot gateway`) and you must have chatted with the bot at least once so it knows which channel to deliver to.
## 🐳 Docker
> [!TIP]
> The `-v ~/.nanobot:/root/.nanobot` flag mounts your local config directory into the container, so your config and workspace persist across container restarts.
### Docker Compose
```bash
docker compose run --rm nanobot-cli onboard # first-time setup
vim ~/.nanobot/config.json # add API keys
docker compose up -d nanobot-gateway # start gateway
```
```bash
docker compose run --rm nanobot-cli agent -m "Hello!" # run CLI
docker compose logs -f nanobot-gateway # view logs
docker compose down # stop
```
### Docker
```bash
# Build the image
docker build -t nanobot .
# Initialize config (first time only)
docker run -v ~/.nanobot:/root/.nanobot --rm nanobot onboard
# Edit config on host to add API keys
vim ~/.nanobot/config.json
# Run gateway (connects to enabled channels, e.g. Telegram/Discord/Mochat)
docker run -v ~/.nanobot:/root/.nanobot -p 18790:18790 nanobot gateway
# Or run a single command
docker run -v ~/.nanobot:/root/.nanobot --rm nanobot agent -m "Hello!"
docker run -v ~/.nanobot:/root/.nanobot --rm nanobot status
```
## 🐧 Linux Service
Run the gateway as a systemd user service so it starts automatically and restarts on failure.
**1. Find the nanobot binary path:**
```bash
which nanobot # e.g. /home/user/.local/bin/nanobot
```
**2. Create the service file** at `~/.config/systemd/user/nanobot-gateway.service` (replace `ExecStart` path if needed):
```ini
[Unit]
Description=Nanobot Gateway
After=network.target
[Service]
Type=simple
ExecStart=%h/.local/bin/nanobot gateway
Restart=always
RestartSec=10
NoNewPrivileges=yes
ProtectSystem=strict
ReadWritePaths=%h
[Install]
WantedBy=default.target
```
**3. Enable and start:**
```bash
systemctl --user daemon-reload
systemctl --user enable --now nanobot-gateway
```
**Common operations:**
```bash
systemctl --user status nanobot-gateway # check status
systemctl --user restart nanobot-gateway # restart after config changes
journalctl --user -u nanobot-gateway -f # follow logs
```
If you edit the `.service` file itself, run `systemctl --user daemon-reload` before restarting.
> **Note:** User services only run while you are logged in. To keep the gateway running after logout, enable lingering:
>
> ```bash
> loginctl enable-linger $USER
> ```
## 📁 Project Structure
```
nanobot/
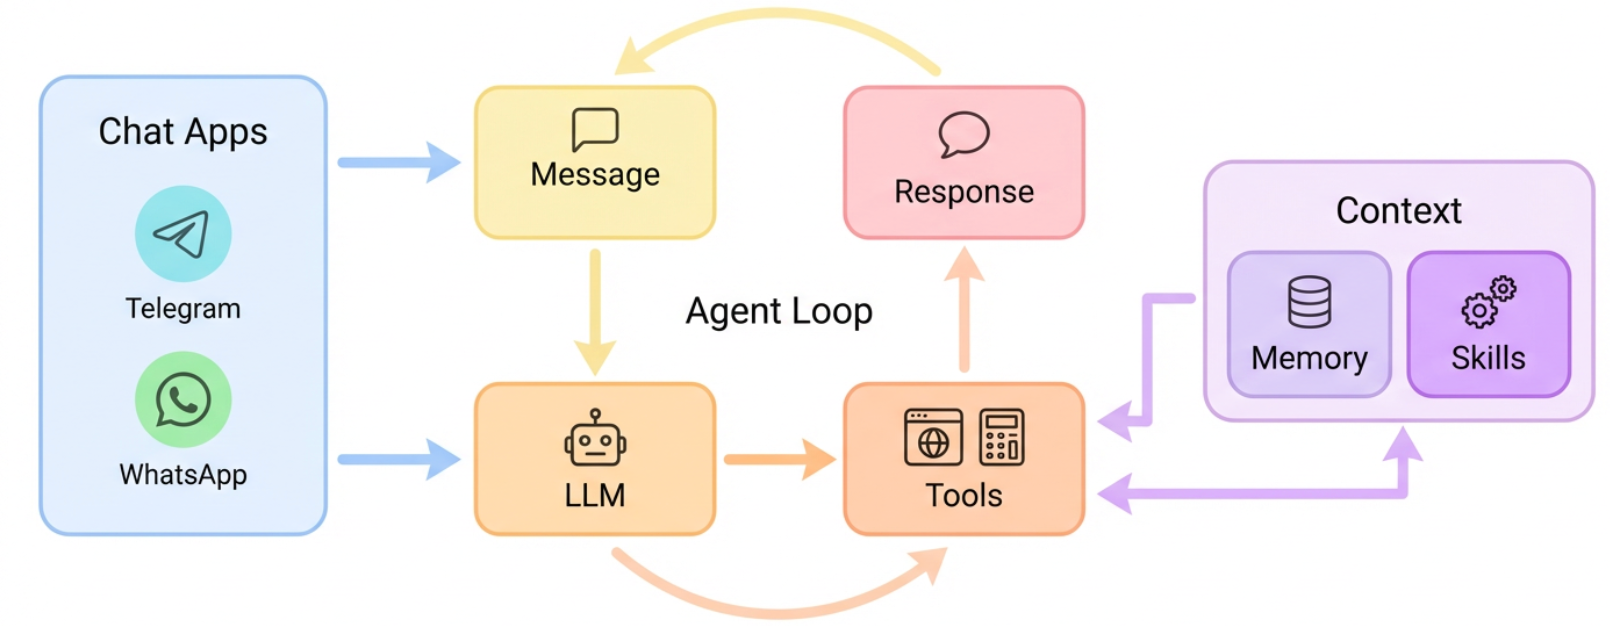
├── agent/ # 🧠 Core agent logic
│ ├── loop.py # Agent loop (LLM ↔ tool execution)
│ ├── context.py # Prompt builder
│ ├── memory.py # Persistent memory
│ ├── skills.py # Skills loader
│ ├── subagent.py # Background task execution
│ └── tools/ # Built-in tools (incl. spawn)
├── skills/ # 🎯 Bundled skills (github, weather, tmux...)
├── channels/ # 📱 Chat channel integrations
├── bus/ # 🚌 Message routing
├── cron/ # ⏰ Scheduled tasks
├── heartbeat/ # 💓 Proactive wake-up
├── providers/ # 🤖 LLM providers (OpenRouter, etc.)
├── session/ # 💬 Conversation sessions
├── config/ # ⚙️ Configuration
└── cli/ # 🖥️ Commands
```
## 🤝 Contribute & Roadmap
PRs welcome! The codebase is intentionally small and readable. 🤗
### Branching Strategy
| Branch | Purpose |
|--------|---------|
| `main` | Stable releases — bug fixes and minor improvements |
| `nightly` | Experimental features — new features and breaking changes |
**Unsure which branch to target?** See [CONTRIBUTING.md](./CONTRIBUTING.md) for details.
**Roadmap** — Pick an item and [open a PR](https://github.com/HKUDS/nanobot/pulls)!
- [ ] **Multi-modal** — See and hear (images, voice, video)
- [ ] **Long-term memory** — Never forget important context
- [ ] **Better reasoning** — Multi-step planning and reflection
- [ ] **More integrations** — Calendar and more
- [ ] **Self-improvement** — Learn from feedback and mistakes
### Contributors
 ## ⭐ Star History
Thanks for visiting ✨ nanobot!

nanobot is for educational, research, and technical exchange purposes only